Welcome back to Monday Motivation!
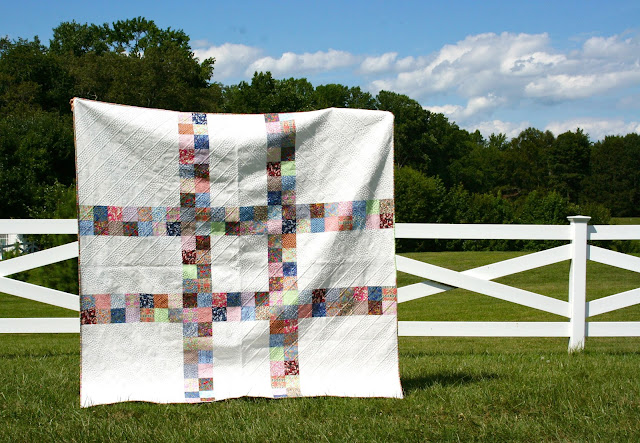
Simple quilts are the best! This Monday Motivation is also a flashback to a quilt I designed for Liberty Lifestyle quilters cotton fabrics. It was on their blog and was the very first quilt featured ( I was stupid excited!)
That section of Liberty has since closed so I am posting the fantastically easy tutorial for you to make in a day ( it is that fast and easy)! This quilt can be made with fabrics you have already in your stash and are unsure of what to do with them!
It is a perfect quilt for a teen, a tween and also to make for a picnic or beach quilt! You can also use a darker background fabric for a very dramatic look.
There are so many possibilities for this great quilt!
Liberty of London is hands down my favorite fabric in the entire world! I have little bits and pieces that I stash and hoard to take out on occasion to just look at the depth of color and fantastic style of the designs. The fabrics themselves are works of art. I have used some in my sewing but have never had enough to make an entire quilt. I was I little more than gobsmacked when the lovely people at Liberty of London asked if I would design a quilt using their new collection of quilting cottons Stile. This was an opportunity I could not pass up. For me, this is a dream come true!
I had a couple of ideas and then had this design pop into my head when I was out running. I drew it out and shared the idea with a couple of friends. My original thought was that this was pathways like in a garden but then my friend mentioned is was an attractive hashtag. He was so right! I cannot think of a better description of this quilt except it is better than a simple hashtag...it is a LOVEtag!
This quilt is a simple scrappy patchwork style quilt that can easily go together in a weekend! It's sized at a very generous 88x 88 to cover a full sized bed beautifully. The quilting, oh my gosh...the fantabulous quilting was done by the very talented and spunky Lisa Sipes using Aurifil 50wt in white. Her work is stunning!
What you will need:
10 fat quarters
The quilt shown has more to show off all the wonderful colors in the Liberty of Love Stile Collection! The extra also made it fun to create a pieced back and scrappy binding.
5.5 yds solid ( Shown is a Liberty of London white)
5/8 to 1 yd fabric for binding. I used a bit extra to make a scrappy binding.
Coordinating thread thread. I used Aurifil 50 wt for the piecing and Lisa Sipes used Aurifil 50wt for the amazing quilting.
Batting
Cut from your fabric
From your fat quarters
160 4.5in squares
From solid fabric
4 28.5in x 28.5in
4 28.5in x 16.5in
1 16.5in sq
To make the assembly easier ( for me) and to give you more options during the assembly I broke down the patchwork squares into sections. This gives the option to change the placement of sets if you do not care for the colors next to each other further into the process.
The 160 squares will be arranged in
8 sets of seven squares
8 sets of four squares
4 sets of four squares
All seams are 1/4in
Quilt top assembly:
Lay out your squares to find a pleasing combination
Take two of the squares and right sides facing line them up
if you need to and feel more comfortable pin squares together
Sew using a 1/4in seam removing pins as you go
I chain pieced mine to make the process faster and more efficient. If you do not know how to chain piece there is a great video on All People Quilt that explains easy it is to do. If you have never chain pieced, it will be life changing!
Once the sets are assembled, press the seams. I pressed mine open but in hindsight, pressing to the side might have been the better choice. You press however you are comfortable! Line up two of the sets
Placing them right sides facing, line up the seams
Sew sets, removing the pins as you go. Repeat this process until you have all the sets sewn together. Be sure to press all the seams after sewing the sets together!
The process is pretty straightforward and simple!
I am still amazed at the quilting by Lisa! Even the in house 11 year old is impressed by it!
The quilt back was made using a few of the pieces left over after cutting the fat quarters and my adorable son decided to photobomb my picture!
I would like to say thank you to the kind people at Liberty of London for allowing me to play with there wonderful fabric, Aurifil for providing the thread used for piecing and quilting, and Lisa Sipes for her awesome skills! I hope you enjoy making this project and it becomes a loved and cuddled quilt in your home.


No comments
Post a Comment